Blog Description

A place for one mom to share her ideas, crafts, stories, and adventures in this exciting time of life called MOTHERHOOD

Wednesday, April 27, 2011

How to Make a Pea Pod Charm

I absolutely love the pea pod charms that you see a lot on Etsy with the wire wrapping around the pearl "peas" looking like an abstract pod.  But I thought it would be cuter if I could actually make a entire pod casing to more closely resemble a traditional pea pod.  So here is how I do it (Just in time for Mother's Day!)

Materials: 
- 36 gage aluminum tooling foil
- 2" silver head pin
- 2-8 6mm glass pearls (or other round beads)
- Needle-nose pliers
- Scissors
- Thin, stiff piece of cardboard or other material
- Jewelry glue (Not pictured)

Optional:
- Decorative bail (To add a bit more sophistication)
- Paper punch (To make a more uniform piece of foil to work with.  Use a punch cuts paper at least 2" in size.  An oval shape like this one or a rectangle would probably work the best.)


STEP 1:
Thread the pearls onto the head pin (I used pearl colors in the birth months to make this gift for my mom for Mother's Day to represent our family.  Using all one color like white or green makes a pretty piece too!).  Wrap the remaining part of the head pin around the pliers to form a loop and then wrap the remainder around the "neck" between the loop and the top bead.


STEP 2:
Cut a piece of the tooling foil out with either scissors or a paper punch.  Cut a size that's around 2"x3/4" (Longer if you are using more beads).  When using an oval, trim the sides down so they are straight and the diameter of the foil is now around 3/4".  Then fold the edges in about 1/8" (Use your cardboard to make a sharp and uniform crease.  Work on a hard, flat surface is best.)  Flatten with a heavy object to the butt end of your tool.  


STEP 3:
Cut a center slit down both sides of the foil (It works best to hold the pin of "peas" in the middle while you do this.)  Cut far enough down so that the slit ends at the top of each bead side.  Make an additional cut 1-2mm to each side (See bottom half of picture).  Trim close to the bottom and then bend down the remainder with the butt of your tool (See top half of picture).


STEP 4:
If using an oval or rounded punch, trim off the rounded points so that the top is straight across.  If using a rectangular punch or cutting it yourself, skip to STEP 5.


STEP 5:
Add a small bead of jewelers glue to the center of the foil piece.  It does not need a lot.  Leave a little bit of room on either end of the slits to avoid seepage.  Add your beads on the head pin, centered in between the two slits and fold the sides up to encase the beads.  Let dry for at least 30 minutes or according to directions on your glue.  


STEP 6:
When dry take your pliers and apply gentle pressure to squeeze the foil around each pearl to form the pod and to hold the "peas" in.


STEP 7:
Mold the end pieces around the end pearls with your fingertips.


STEP 8:
Using the tips of your pliers (Or a toothpick), gently curl the edges out towards you to form a little scroll on the ends.  Repeat for the 4 sections.


You're finished!  You made a wonderful and thoughtful piece of jewelry perfect for any mom or friend on your list.


I'm submitting this to win the title of:


This tutorial is for INDIVIDUAL USE ONLY, not for resale.

Wednesday, April 20, 2011

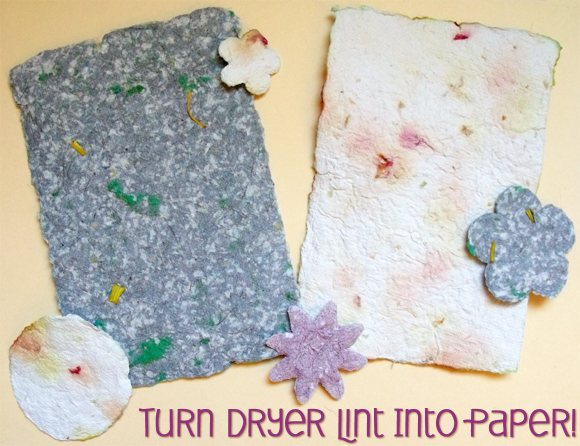
Make Paper Out of Dryer Lint

My first craft tutorial! I'm very excited about this one :)

Learn how to Make Paper Out of Dryer Lint!

Turn Dryer Lint Into Paper

Just click on the link above and it shows you a super easy way to make handmade paper using items you probably already have on hand. This is a GREAT craft idea to do with the little ones to make Mother's and Father's Day cards for someone they love. I remember doing this in my 3-D art class in high school. Its very simple, messy, but most of all fun! You can use any paper you have on hand if you don't have dryer lint available (or just plain don't want to use it!) the same process applies.  You will never get the same paper twice!

Mix it Up!:

- You can even add dried flowers, glitter, other color paper, food coloring, anything you can think of to the mix
- You can make the card AND the gift! Just use some cookie cutters on hand (Or go to your local craft store and get them for less than $1 a piece) and make an adorable ornament
- Add flower seeds to the mix (after you blended it) and you can make plantable cards and ornaments. Just plant the paper you made and in a few days, you can see plants growing! This makes a BEAUTIFUL party favor for weddings, bridal showers, and baby showers. Plant some love :)

Friday, April 8, 2011

Coupon Help

Lots of my friends have been asking, "How do you do that???  Can you teach me?" about my coupon experiences and well...I will share my findings!

- I highly recommend getting the Sunday news or asking friends to give you the coupon inserts.  Remember, you if you have 5 coupons for an item, you can get 5 items at that price!

- Do sign up with big-name companies whose items you use often.  They will usually send you coupons just for signing up with them and will usually give you a free printable coupon when you do.  Some will even give you free samples!  I just got two free samples of Always pads and 2 $1 off coupons (One for any Always product and one for Always panty liners, so I could stack these!)

- You can stack a store coupon (you can find these in the paper or they print out with your receipt, AKA: "cat or catalina" coupons) with a manufacturer coupon.  Some places even let you use more stacked coupons!  For example: You have a $.50 off Tropicana Orange Juice, a $.25 off any Tropicana product, plus you have a store coupon for $.75 off Tropicana (Most stores will double coupons up to $1) so after doubling you can save $2.50 off OJ!!!

- Make sure that you sign up for the free grocery savings cards at all of your local stores.  When you have a bonus card you get special offers, TONS of savings plus gas points!  Also sign up on their websites for their free weekly ad emailed to you so you can plan your shopping trips based on their sales.  Because unlike retail stores you CAN use coupons for sale items!

- I look over the grocery store ads for the week and then mark everything I want to buy that's brand-name.  Then I look in Diva's coupon database and Coupons.com for what I need.  I print out everything I want and take all of the coupons.  You never know when there is something you missed!

- I also double check which is a better deal, the brand-name with the coupon or the store-brand.  Sometimes its cheaper to get the store-brand even after a brand-name with coupon!

- http://www.coupons.com - They have MOST of the coupons from the Sunday paper and even some that didn't make it.  All you have to do is click and print!  They refresh coupons every week so keep checking back.

- http://www.weusecoupons.com - They have a Facebook page and its just a big message board full of people with their stellar deals and steals along with a heads up on coupons and local sales.

- http://www.budgetsavvydiva.com/coupons/coupon-database/ - Here you can search for coupons and then click on the blue links to print them out for yourself.  You can get an idea of where to find what if there isn't a link posted.  Make sure you follow Budget Savvy Diva on Facebook.  She's posting a new deal or freebie every hour on the hour!

P.S. Target has COUPONS!!!  Scroll down to the bottom of their web page and you'll see a little link that says "coupons".  You can use the Target coupons, plus manufactuer coupons at Target for some great savings!  Plus Target is a few cents cheaper than Walmart!


Please feel free to email me or comment below if you have any questions :)

Thursday, April 7, 2011

Couponing Chronicles Part 5

Today was our most epic coupon adventure yet!!!

This week Giant had 4 $1 coupon doublers in their Sunday ad.  That means for 4 $1 off coupons you use, you get an extra $1 off each one!  So hubby, baby, and I headed out this morning to the grocery store.

Note: Monday-Thursday mornings are by far the best time to grocery shop along with after 8 p.m. on those days (No lines and not very busy).  Friday mornings bring out the elderly shoppers and Friday evenings bring out the people wanting to beat the weekend rush.  And Saturdays and Sundays are a no-no!  But if you HAVE to go on the weekend, Sundays are the best.

Our haul:
- 10 Powerade Zeros (Orig: $10 store card took $.23 off) = $7.70
- Tucks pads (Orig: $5.99 $1 off and $1 coupon doubler) = $3.99
- Trop 50 Apple Juice ( Orig: $2.89 used store coupon) = $1.99
- Deer Park 24 pack of water (Orig: $4.99 used store coupon) = $2.99
- 3 Gerber Organic baby food 2-packs (Orig: $3.27 used $1 off 3 and $1 coupon doubler) = $1.27
- Kraft American Cheese Singles (Orig: $3.65 store card took $.35 off $1 off coupon and $1 coupon doubler) = $1.30
- Always Pantyliners 60 count (Orig: $3.19 used $1 off and $1 coupon doubler) = $1.19
- 9 Similac Senstive Ready to Feed (Orig: $48.51 used $5 off) = $3.51
- Bounty paper towel roll (Orig: $1.99 used $1 off and $1 coupon doubler) = FREE

Total before savings: $84.48
Total savings: $59.55
TOTAL: $25.46

That's a savings of: 70%


Yahoo!!!!!!!!!!!!!!!!!!!!!!!!!!!!!!!!!!! :D

Friday, April 1, 2011

Remembering Our First Peek...

One year ago today me and my hubby got our first peek at the little baby growing inside of me!  Now he's a week away from being 5 months!  That first magical glimpse of our future baby was so amazing...words just cannot describe it.  He was the size of a grape when we first saw him!  It just takes my breath away to think of this wonderful blessing that us women get to partake of, growing and giving birth to a baby!  My mind just boggles with the thought of him growing from just a few cells into a human being that brings me so much joy!  So here is an excerpt from my journal from that day:

"Well, this was quite a milestone week!

First it all started with a rescheduled doctor's appointment on Thursday. I was into the room with the nurse and she informs me and DH that I'll be getting an H1N1 vaccine, pap smear (...yippee...), and...an ULTRASOUND!!! Which we were both hoping for but thought we would have to fight to get one. Nope!

Oh gosh...was it magical! I gripped DH's hand so tight as we saw the little grape flash up on screen. Baby was moving around like crazy and the nurse first took a picture of baby's back as it rolled over mid-picture! We got to hear the heartbeat twice and it was sooooooo wonderful! I can still hear that muffled, rapid little heart beating away at 175 BPM! My eyes got all teary, I could have stayed at that office all day watching our little baby! We got 5 pictures to take home and a clean bill of health so we felt very good about telling our families this past weekend!..."